Femtosecond spectroscopy uses an ultrashort laser pulse to start a photo-chemical reaction at a well defined moment in time. A second ultrashort laser pulse can be used to visualize the ongoing photo-chemical reaction [1]. To achieve a precise timing between two laser pulses, a laser beam is usually split into two parts. One part of the beam is directed towards the experiment, the second part passes a translation stage before recombination of both beams occurs. By precisely moving the translation stage by a certain distance, the pathway is increased and laser pulses will arrive with a time delay Δt=Δx/c, where c is the speed of light.
The recombined beams are focused before they interact with the sample/molecule/surface. To achieve good experimental results, the overlap of the two laser beams should not change while the translation stage is moved. This can only be achieved by proper alignment of the translation stage.
If you try to align a translation stage the first time, you will figure out, that it’s a little tricky. In the following, I’ll give a description and some hints on how to set up a translation stage. The main purpose of this manual is to educate our students in daily operation of laser equipment used in our laboratory. Always handle given information with care, think and discuss about problems. A manual never replaces the need of conscientious working.
The things you need to get started are a laser pointer/diode (close to the wavelength of your laser) and two apertures.
| SAFETY RULES |
|
- place the stage on the table: This seems to be quite easy. Nevertheless, be aware that every tilt of the stage results in a displacement of the beam and thus in a decreased timing accuracy. For standard pump-probe measurements, this might not be a crucial issue, but for Fourier transform spectroscopy it becomes more important with increasing delays. To properly fix the stage to the table, screw in the screws but do not tighten them yet completely. Press the stage towards the screws from one of the long sides of the stage and tighten the screws.
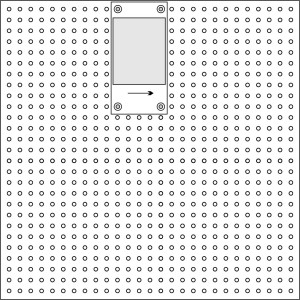
Figure 1: Push the translation stage sidewards against the fixing screws, before tightening the screws completely. - place the mirrors onto the stage: Make sure that you place them in a correct 45° angle! You can do it using the naked eye or some tools that might make your life easier, like the laser pointer and the two apertures. Most of the laser tables have a hole mask of 25 mm x 25 mm. Finding a perfect 45° angle for alignment should therefore not be to difficult. More difficult is to adjust the mirror so that the reflecting surface has a 90° angle towards the surface of the laser table. Place the apertures with exactly the same height onto exactly one of the diagonal lines of the table. Eliminate every degree of freedom beforehand. Best way to do this is to place the apertures onto prepared posts, which have the right height to make your apertures fit the beam hight. Most of the posts have a centered thread on the bottom. This thread you can use to center the posts along a diagonal line of the hole mask. If you take a long distance and shoot the laser pointer through the apertures straight onto one of the mirror and reflect it back onto the pointer, you can be sure the first mirror is aligned in a sufficiently exact 45° angle. Don’t ever do this with the real laser beam!!! ,to avoid damages to the system! You break a laser pointer, it’s only a few dollars, you break the laser, it’s way more than that. After finishing the alignment of the first mirror, repeat the same procedure with the second mirror.
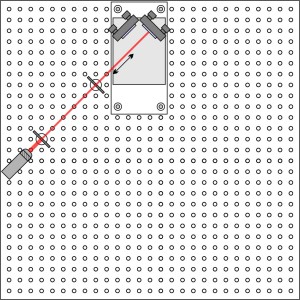
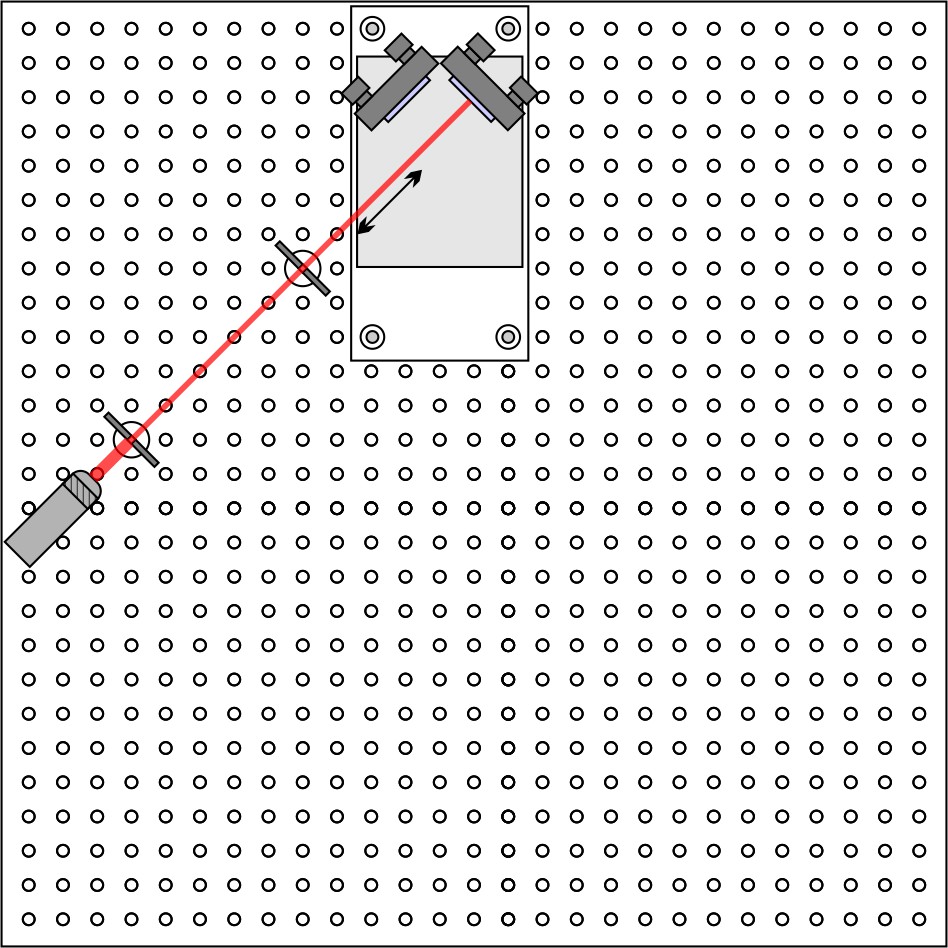
Figure 2: Shoot a laser pointer through to equally high apertures onto the reflecting surface of the mirror. Use the adjustment screws from the mirror holder to reflect it back through the apertures onto the laser pointer. - Couple the laser into the translation stage: Now that you have the mirrors prealigned, it is time to align the translation stage with the real laser beam. First, put a beam block in front of the output of the translation stage. Second, place the apertures in line so that they point towards the first mirror of the stage. It’s easier if you have long distances assuming the laser is perfectly collimated. Shoot the laser through the apertures onto the first mirror. If you did a good job aligning the mirrors, the outcoming beam should already be on the same height. Check this by using one of the apertures.
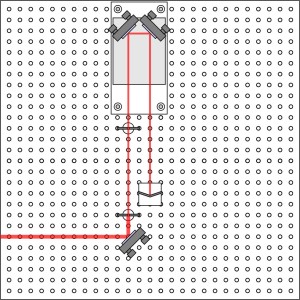
Figure 3: Couple the laser into the translation stage setup using the two apertures. Check the hight of the outcoming beam by moving one of the apertures. - Fine tuning: Even you tried very hard to achieve a perfect alignment, it might not be sufficient to keep a stable overlap between the focal points of both laser beams. To make sure the focal point doesn’t move, you have to check the laser beam pointing in the far field. Far field means, the laser should have travelled at least a longer distance, than it needs to travel to the experiment. Now make sure the laser beam doesn’t move in the far field by driving the stage back and forth. If you drive the stage towards longer delays, you have to correct displacement with the second mirror on the translation stage.
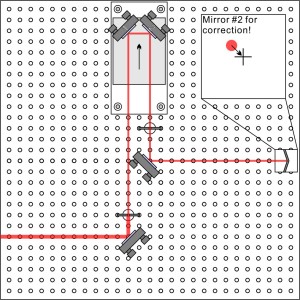
Figure 4a: Check the displacement of the laser beam in the far field by moving the translation stage towards longer delays. A diplacement of the beam needs to be corrected with mirror #2. If you drive to shorter delays, you have to correct into the same direction the laser is moving. Use the first mirror on the translation stage for that. Make sure to move the beam back into the target with a mirror behind the stage before repeating the procedure.
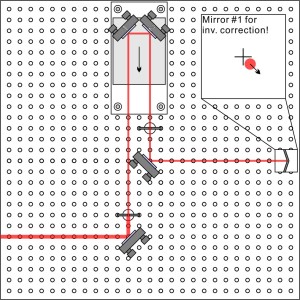
Figure 4b: Check the displacement of the laser beam in the far field by moving the translation stage towards shorter delays. A diplacement of the beam needs to be compensated by displacing the beam further with mirror #1. If you did a good job, the laser doesn’t move in the far field and the overlap of recombined laser beams doesn’t change while the stage is moved and your pump-probe signal is recorded.


This isn’t the only recipe, but it’ll work for you, if you have problems. If you have any comments on this post, feel free to use the comment box below. ~
[1] Ahmed. H Zewail, ‘Laser Femtochemistry’, Science 242, 1645 (1988)